Instant messaging integration in outlook webapp enable the user to publish his presence and view the presence of other contacts without really having a local skype for business client running. By default, the integration between exchange 2016 and skype for business server for this feature is not enabled, however you may follow the below simple steps to enable this. With previous versions of exchange, we need to manually edit the web.config file with the exchange certificate thumbprint to make this working. Also if Microsoft Exchange Unified Messaging Call Router service and the Microsoft Exchange Unified Messaging service runs on the same box then there was no need to create an application pool for outlook webapp integration. However, this two steps have been replaced with Exchange 2016(all roles in same box).
Before you start:
Ensure Server-Server Authentication is established between Exchange 2016 and Skype for Business Server. You may follow my article Exchange 2016 & Skype for Business 2015 server-server authentication to get this working.
My lab setup consists of one Exchange 2016 and Skype for business Std edition server. However basic process remains same throughout in Skype for Business Enterprise Edition also. We will start with the exchange side configuration first.
Configuration on Exchange Server Side:
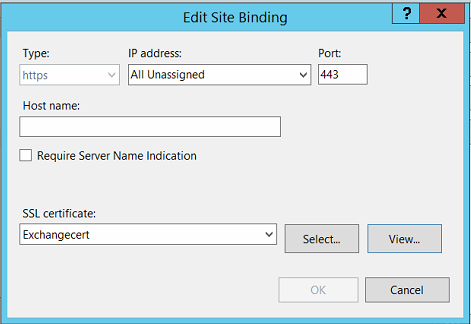
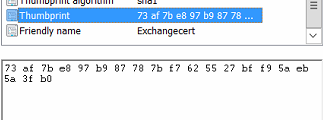
i) Get the certificate details using the command “Get-ExchangeCertificate”, make a note of the thumbprint for certificate in iis.

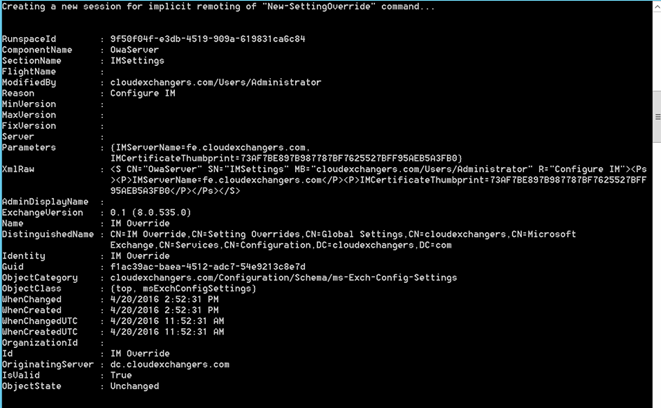
ii) From Exchange Management Shell, specify the IM server and IM certificate thumbprint as below.
New-SettingOverride -Name “IM Override” -Component OwaServer -Section IMSettings -Parameters @(“IMServerName=fe.cloudexchangers.com.contoso.com”,”IMCertificateThumbprint= 73AF7BE897B987787BF7625527BFF95AEB5A3FB0″) -Reason “Configure IM” -Server Mbx1
Note: If you want to make the changes on more than 1 exchange server, remove -Server Mbx1 parameter from above cmd.
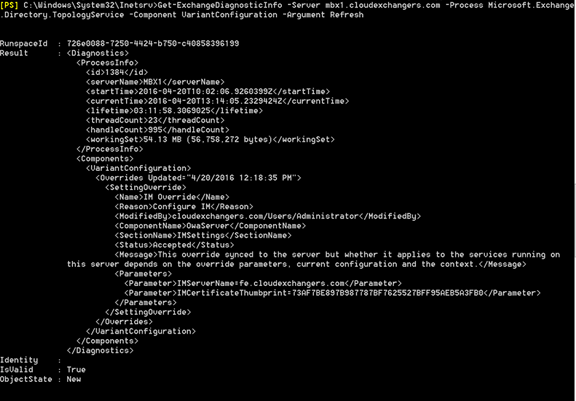
iii) From Exchange Management Shell refresh, the IM settings on the server. Do this on every Exchange 2016 server that’s used for Outlook webapp.
Get-ExchangeDiagnosticInfo -Server MBX1 -Process Microsoft.Exchange.Directory.TopologyService -Component VariantConfiguration -Argument Refresh
iv) Restart outlook web app application pool as below.
Restart-WebAppPool MSExchangeOWAAppPool

v) Validate the owa virtual directory.
Run Get-Owavirtualdirectory , InstantMessagingEnabled should be set to true and Instant messaging type should be OCS.
You can manually set it using below command.

vi) Enable the users for Instant Messaging in Outlook web app by editing the existing owamailboxpolicy or you can create a new one and apply to respective users.
Get-OwaMailboxPolicy | Set-OwaMailboxPolicy -InstantMessagingEnabled $True -InstantMessagingType “OCS”

By now we had completed the integration part from Exchange Side. I was little confused with the article Configure instant messaging integration with Outlook on the web at this point, because it never explains about the integration part from the Skype for business side. At this point I checked the owa of the user and found error “There’s a problem with instant messaging. Please try again later.”

vii) However, validate the Exchange server side IM settings by running the below command.
[xml]$diag=Get-ExchangeDiagnosticInfo -Server mbx1.cloudexchangers.com -Process Microsoft.Exchange.Directory.TopologyService -Component VariantConfiguration -Argument Config; $diag.Diagnostics.Components.VariantConfiguration.Configuration.OwaServer.IMSettings

Configuration on Skype for Business Server:
Now, we need to make Exchange a trusted application on Skype for Business Topology. This is just a three step process as mentioned below.
- Create a new Trusted Application Pool.
- Create a trusted application.
-
Enable Topology
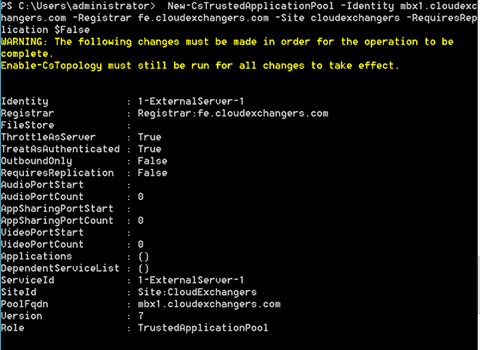
i) Create trusted application pool as below.
New-CsTrustedApplicationPool -Identity mbx1.cloudexchangers.com -Registrar fe.cloudexchangers.com -Site cloudexchangers -RequiresReplication $False
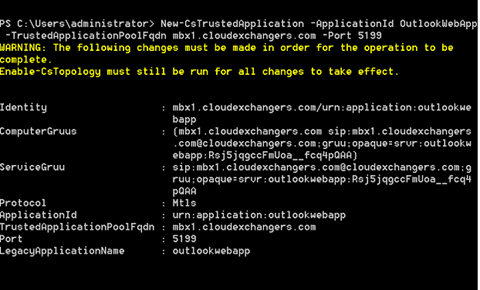
ii) Crete a trusted application and map it to the pool we created above.
New-CsTrustedApplication -ApplicationId OutlookWebApp -TrustedApplicationPoolFqdn mbx1.cloudexchangers.com -Port 5199
iii) Run Enable-CsTopology to enable the changes.

By now we had completed the instant messaging integration in outlook web application.
Login to Outlook web app, on the right side top you will find the presence information as below.

Happy Learning…!!!
If you have any feedback or suggestions, please comment below.
Thanks,
Anoop Karikuzhiyil Babu
Former Microsoft Premier Unified Communication & Exchange Engineer.